- Как выполнить стресс-тест процессора и системы в целом, держит ли он частоты, нет ли перегрева (AIDA 64)
- Как выполнить стресс-тест
- ШАГ 1: выбор программы
- ШАГ 2: запуск теста
- ШАГ 3: контроль и результаты. На что обратить внимание
- [SOLVED] CPU usage 100% issue
- Try these fixes
- Fix 1: End the processes that consume lots of CPU resources
- Fix 2: Update your drivers
- Fix 3: Modify Settings in Registry Editor
- Fix 4: Run an antivirus scan
- Fix 5: Disable P2P Share
- Fix 6: Modify Windows notification settings
Как выполнить стресс-тест процессора и системы в целом, держит ли он частоты, нет ли перегрева (AIDA 64)
 Доброго времени суток!
Нередко требуется узнать о состоянии, возможностях и надежности железа компьютера или ноутбука (например, после выполнения разгона или при наличии каких-то подозрений, что что-то не так. ) .
Сделать это можно с помощью стресс-теста, который позволяет:
- узнать реальную частоту работы процессора, видеокарты (полезно при покупке нового ноутбука, например, или при замене комплектующих) ;
- посмотреть, держит ли процессор частоты при длительной нагрузке ( примечание : если температура выйдет за пределы оптимальной – он может начать пропускать такты и снижать производительность, так называемый троттлинг);
- оценить систему охлаждения, справляется ли она, оценить диапазоны рабочей температуры (возможно, что стоит установить доп. кулер, например) ;
- проверить надежность устройства: нередко при стресс-тесте выявляются все слабые места ✔.
В этой статье предложу один из способов, к которому часто прибегаю сам. Он, конечно, не идеальный, но весьма удобный. Возможно, кому-то окажет добрую помощь.
У AIDA есть и аналоги (на случай, если данная утилита откажется запускаться в вашей ОС). О них я рассказывал в статье о 4 лучших программах для стресс-тестирования ЦП

Как выполнить стресс-тест
ШАГ 1: выбор программы
Для тестирования и диагностики системы сейчас достаточно много программ: OCCT, AIDA 64, ASTRA, Prime95, LinX, и др. Я все же сторонник использования AIDA 64 (собственно, ее и рекомендую вам).
AIDA 64

В чем ее основные преимущества:
- при тесте она хорошо нагружает все компоненты компьютера;
- в одном окне можно наблюдать температуру (макс., мин., среднюю), частоту работы ЦП, и пр. характеристики;
- позволяет, помимо теста, быстро узнать практически любые характеристики железа;
- есть портативная версия, не нуждающаяся в установке (это значит, что ее можно записать на флешку и проверить любой ПК/ноутбук) ;
- стабильно и надежно работает с любым железом.
Свои дальнейшие действия покажу в AIDA 64 Extreme v5.8.
ШАГ 2: запуск теста
Буду считать, что вы установили русскую версию (прим.: просто есть версии на англ., немецком и пр. языках) . Также отмечу, что перед тестом необходимо закрыть все ресурсоемкие приложения: игры, редакторы, архиваторы и т.д.
Для открытия окна тестирования в AIDA 64 нажмите по меню » Сервис/Тест стабильности системы» (см. скрин ниже).
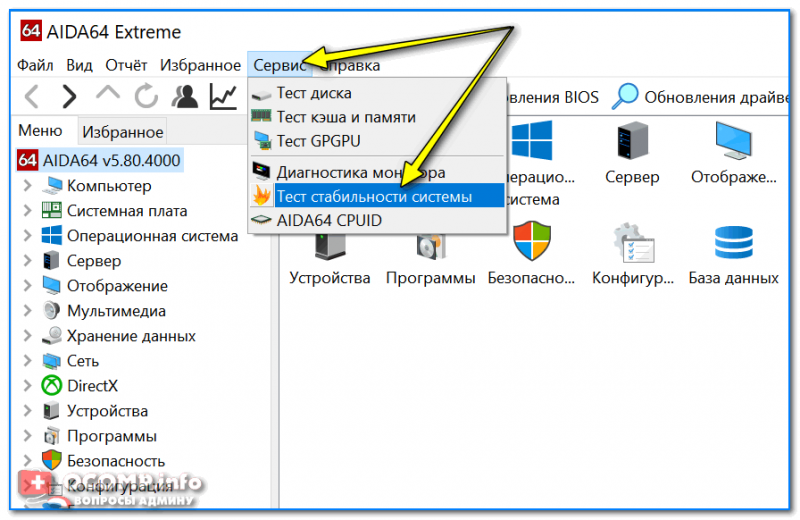
Тест стабильности системы
Далее обратите внимание на левый верхний угол (расшифрую несколько аббревиатур) :
- Stress CPU – проверка центрального процессора;
- Stress FPU – проверка математич. сопроцессора ( прим. : производительность в вычислениях с плавающей запятой, создает высокую нагрузку на CPU) ;
- Stress cache – кэш;
- Stress system memory – проверка системной памяти;
- Stress local disk – проверка диска;
- Stress GPU – проверка видеокарты.
По умолчанию, обычно, выбрано первых 4-пункта (в принципе, этого достаточно для тестирования системы и ЦП). Чтобы начать проверку – нажмите на кнопку «Start» в нижней части окна.
Важно! Нагрузка на ЦП должна сразу же дойти до 100%, температура начнет расти и гул от кулера будет становится все громче (по крайней первую минуту теста). Внимательно следите за состоянием и поведением ПК.

Начало теста / Кликабельно
В первую очередь следите за температурой ЦП (чаще всего именно она выходит за пределы оптимальных значений и процессор начинает сбрасывать частоты). Дать конкретную величину нельзя: т.к. у каждого модельного ряда она будет своей.
Скажем, для Intel Core i3÷i7 (7-8-х поколений) считается критической температурой
100 °С (градусов Цельсия) . Поэтому, если температура перешагнула за 85 °С — остановите тест!

Температура процессора Intel: как ее узнать; какую считать нормальной, а какую перегревом — https://ocomp.info/temperatura-protsessora-intel.html
ШАГ 3: контроль и результаты. На что обратить внимание
Многие спецы советую тестировать работу ПК не менее 30÷60 мин., на мой же взгляд даже 15 мин. будет достаточно (обычно, если с системой все в порядке, то через первых 4-5 мин. работа стабилизируется и графики превращаются в прямые линии) .
Обычно, особый интерес представляет вкладка «Clock» (и «Statistics», о ней ниже) , в которой отображается частота работы процессора. В идеале, она должна быть максимальной для вашей модели ЦП*, и график должен быть «прямой» во время теста (т.е., достигнув, скажем, 3092 MHz, как в моем примере ниже, она не должна проседать ниже. ) .
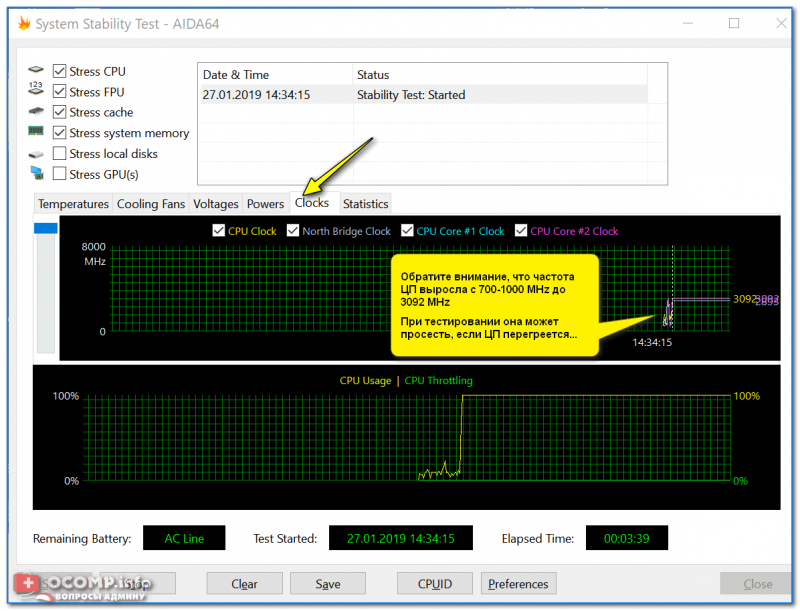
Частота работы ЦП
Кстати, если кто не знает точную модель своего ЦП и на какой частоте в идеале он должен работать, можете ознакомиться с моей статьей, ссылка на которую приведена ниже. Как правило, достаточно зайти на сайт производителя (например, Intel), и посмотреть в характеристиках строки «Processor Base Frequency» (базовая частота) и «Max Turbo Frequency» (частота при задействованном Turbo Boost) .
В помощь! Как узнать точную модель своего процессора (CPU), посмотреть его спецификацию, характеристики — https://ocomp.info/kak-uznat-model-protsessora.html
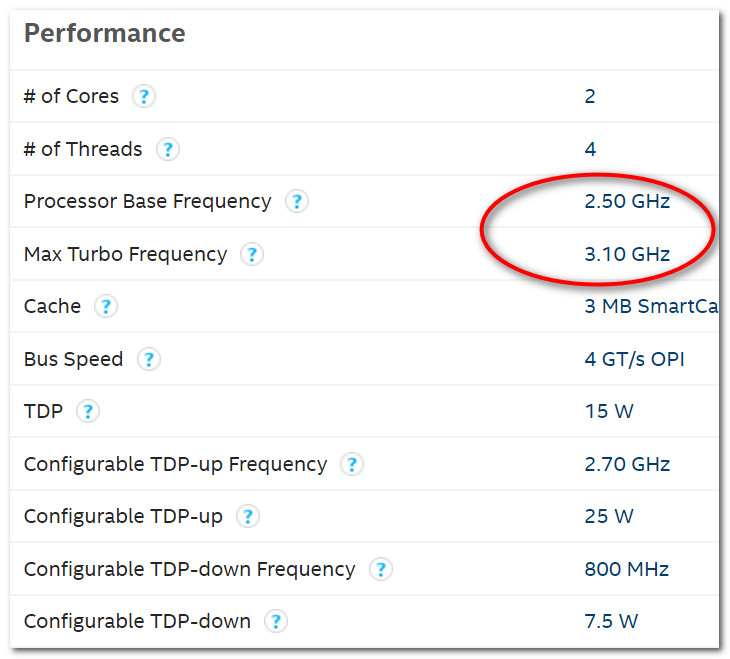
Частоты работы процессора (Core i5-7200U)
Довольно удобно мониторить питание, температуру, и частоты во вкладке «Statistics» (см. скрин ниже). AIDA 64 отображает сразу несколько значений: текущее (Current), минимальное (Min.), максимальное (Max.), и среднее (Average).
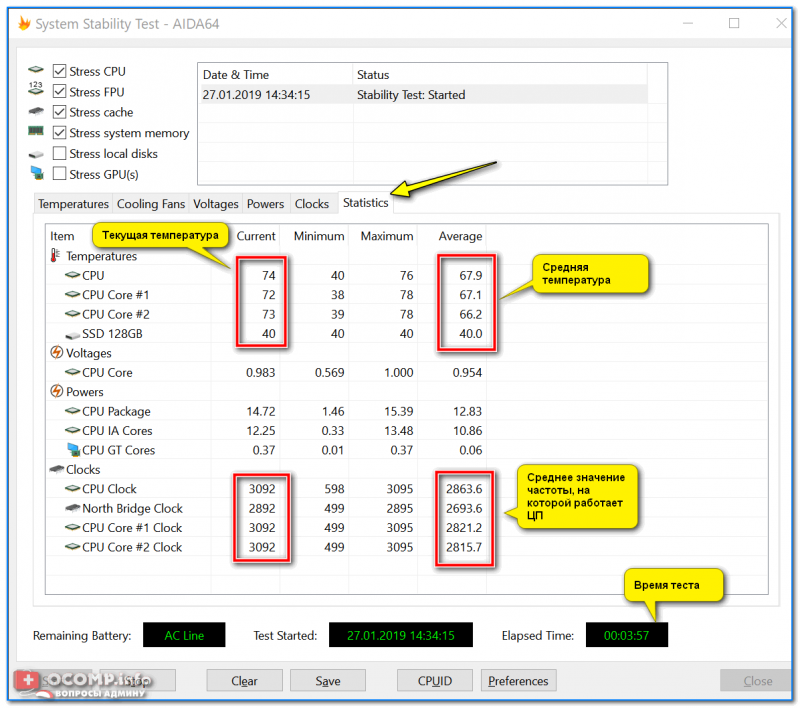
Статистика (AIDA 64)
Кстати, после остановки стресс-теста – текущая частота ЦП (CPU Clock) и его загрузка (CPU Usage) на графике должны снизится (см. скрин ниже).
Также обратите внимание на график загрузки (на надпись CPU Throttling) – в идеале она должна быть «зеленой», как у меня в примере.
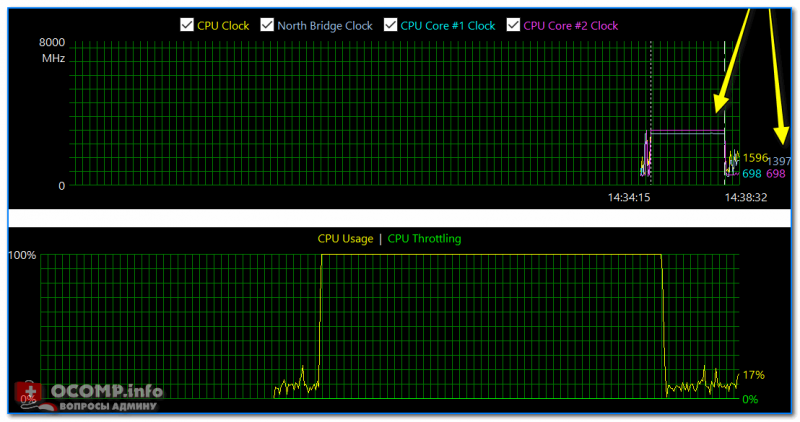
После завершения теста (обратите внимание на графики нагрузки и частоты работы ЦП)
Однако, если во время теста был троттлинг (т.е. ЦП пропускал такты (снижал свою производительность)) , вы увидите, «красную», надпись, вроде «CPU Throttling — Overheating Detected. «.
Источник
[SOLVED] CPU usage 100% issue
Last Updated: 7 months ago
Are you suffering from the 100% CPU usage or high CPU usage issue? Don’t worry… Although it’s incredibly frustrating, you’re definitely not the only person to experience this problem. Thousands of users have recently reported the very same issue. More importantly, you should be able to fix it pretty easily.
Try these fixes
Here’s a list of fixes that have resolved this problem for other users. You don’t have to try them all. Just work your way through the list until you find the one that does the trick for you.
Fix 1: End the processes that consume lots of CPU resources
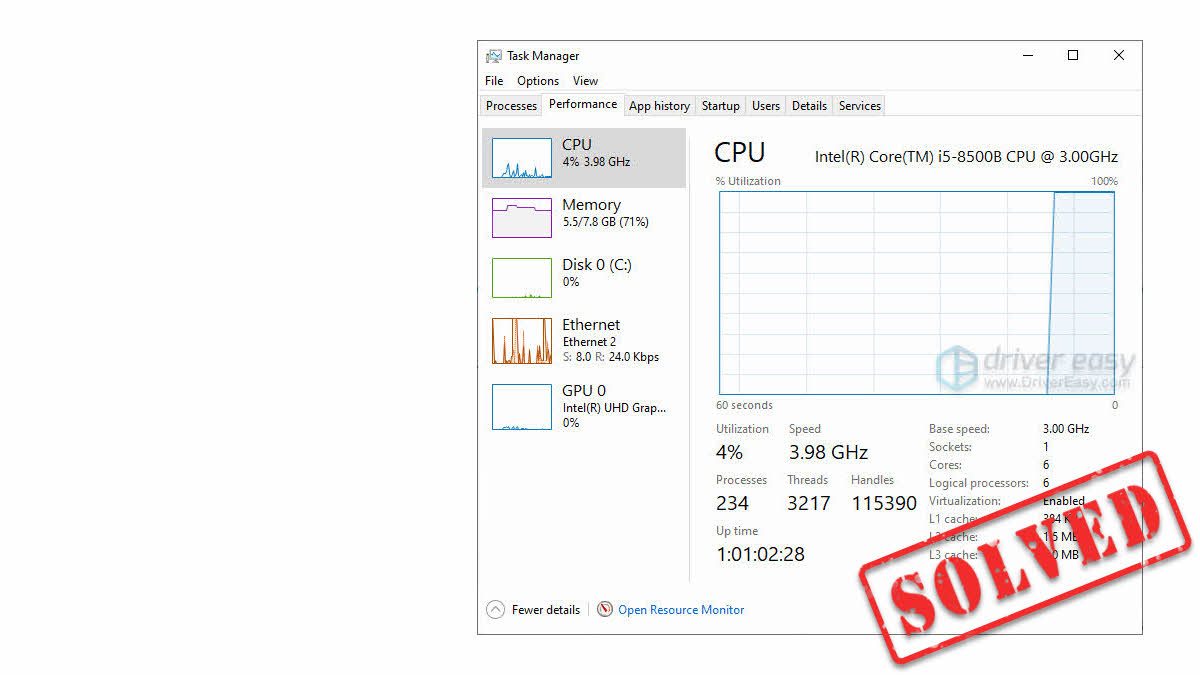
When you notice that your PC becomes slower than usual and the CPU usage is at 100%, try opening Task Manager to check which processes are hogging so much CPU usage. Here is how to do it:
1) On your keyboard, press Ctrl, Shift and Esc to open Task Manager. You’ll be prompted for permission. Click Yes to run Task Manager.
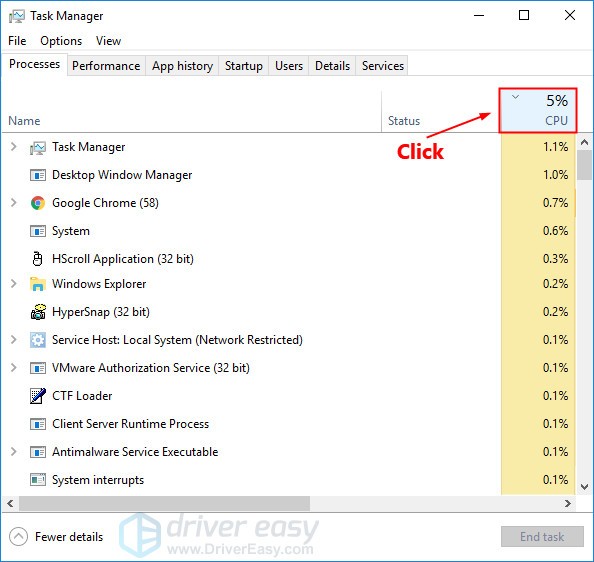
2) Click the CPU column header to sort the processes by CPU usage. Now you can check which processes eat up your CPU.
3) Select the process that consumes lots of your CPU and then click End task to kill this process.
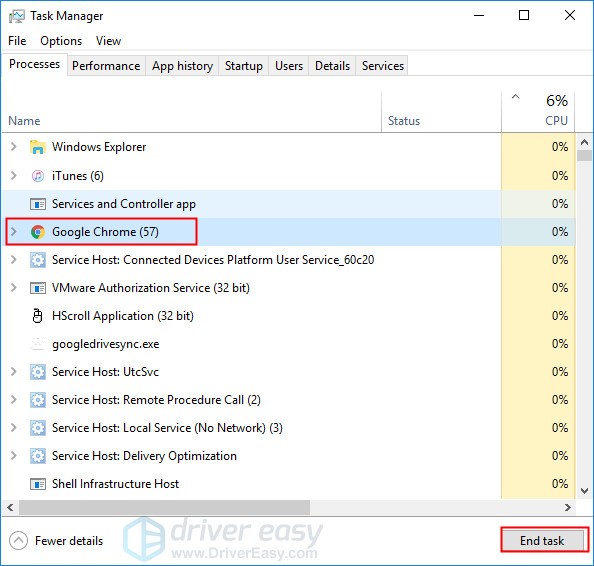
See if the CPU usage is still at 100% after you end all the process that eat up the CPU. If not, congratulations! You’ve resolved this issue. If this issue persists, try the next fix.
Fix 2: Update your drivers
Some outdated or missing drivers may also trigger this issue. By updating your drivers to the latest version, you may fix compatibility issues or bugs that cause high CPU usage.
Here’re two trusted ways you can update your device drivers — manually or automatically.
Manual driver update – You can update your device drivers manually by going to the manufacturer’s website, and searching for the most recent correct driver for the exact device.
Or
Automatic driver update – If you don’t have the time, patience or computer skills to update your drivers manually, you can, instead, do it automatically with Driver Easy.
1) Download and install Driver Easy.
2) Run Driver Easy and click the Scan Now button. Driver Easy will then scan your computer and detect any problem drivers.

3) Click Update next to any device to automatically download the correct version of its driver, then you can install it manually. Or click Update All to automatically download and install the correct version of all the drivers that are missing or out of date on your system (This requires the Pro version – you’ll be prompted to upgrade when you click Update All. You get full support and a 30-day money back guarantee).

Fix 3: Modify Settings in Registry Editor
Many users reported that the built-in voice assistance: Cortanta may also trigger the high CPU usage or even 100% CPU usage issue. If you enabled Cortana, you may encounter the same issue.
If. you’re not a heavy user of Cortane, try modifying settings in Registry Editor to see if you can fix this issue. Here is how to do it:
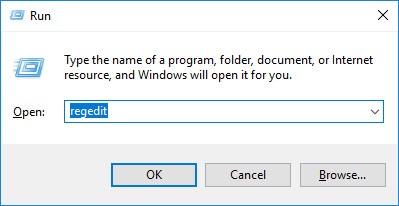
1) On your keyboard, press the Windows logo key and R at the same time to open the Run dialog. Type regedit and then press Enter to open Registry Editor. You’ll be prompted for permission. Click Yes to open it.
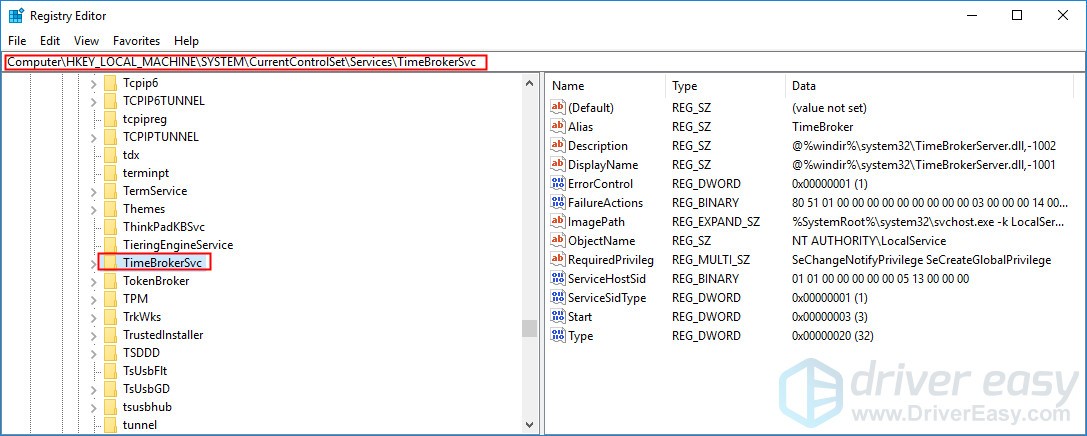
2) Follow the path to locate the correct system files:
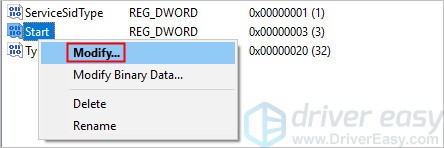
3) On the right side of the pane, right-click Start entry, then select Modify….
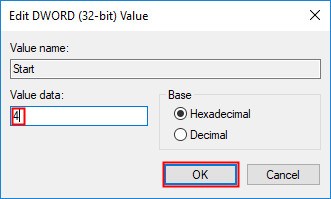
4) Change the Value data to 4, then click OK to save the change.
See if this annoying issue remains. If not, you’ve resolved this issue. If this problem reappears, don’t worry. There are more fixes for you to try.
Fix 4: Run an antivirus scan
Malware or viruses on you PC may also cause the CPU 100% usage issue. So try running an antivirus scan to see if there are viruses, spywares or Trojans on your PC.
If the antivirus software on your PC detected malware or virus, you need to delete them immediately. After you deleted all the viruses, this issue will be fixed.
If your antivirus software didn’t detect any malware, it may suggest that the malware or virus may not be the cause of the high CPU usage issue. In this case, try the next fix, below.
Fix 5: Disable P2P Share
The P2P Share feature on your Windows 10 PC may also caused the 100% CPU usage issue. Try disabling this feature to see if this issue can get fixed. Here is how to do it:
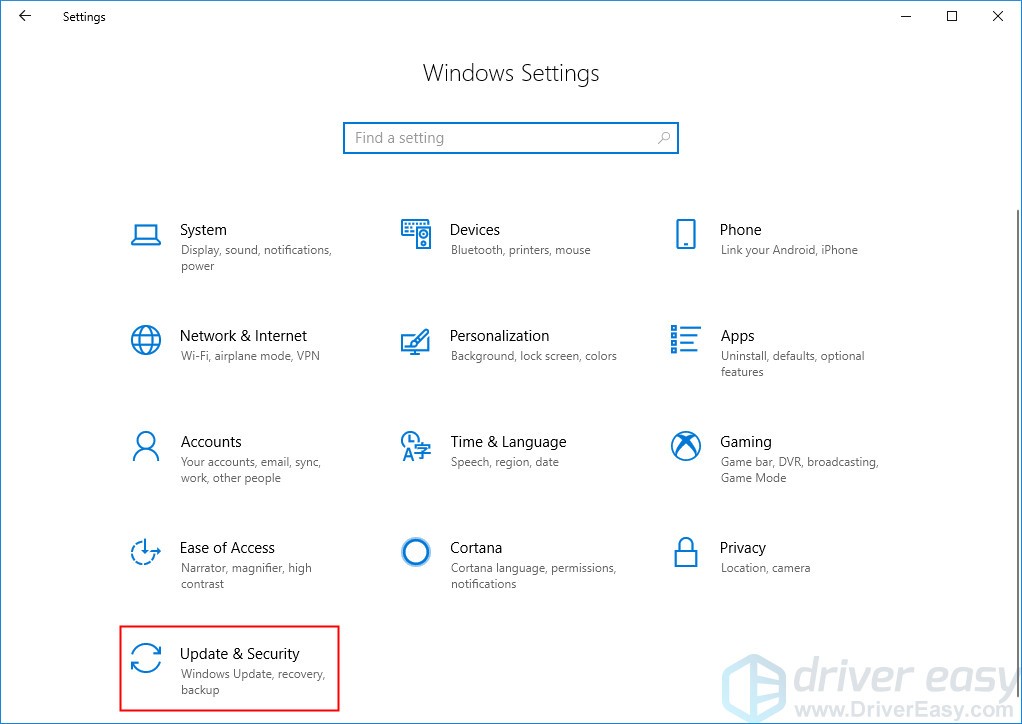
1) On your keyboard, press the Windows logo key and I at the same time to open Windows Settings. Then click Update & Security.
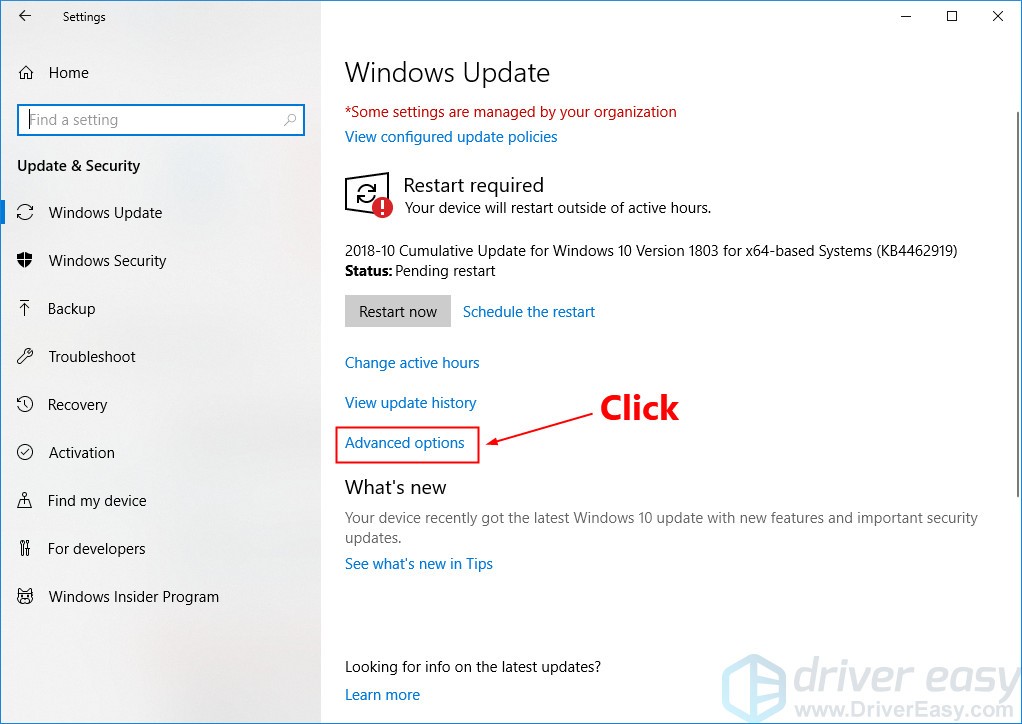
2) Click Advanced options.
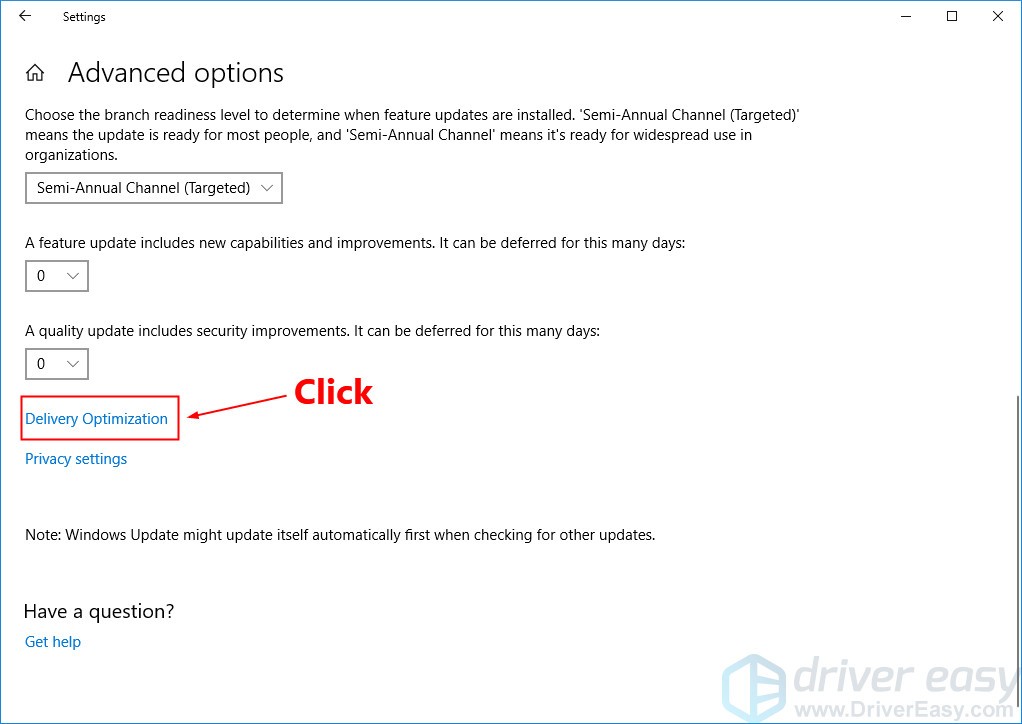
3) Scroll down a little bit and then click Delivery Optimization.
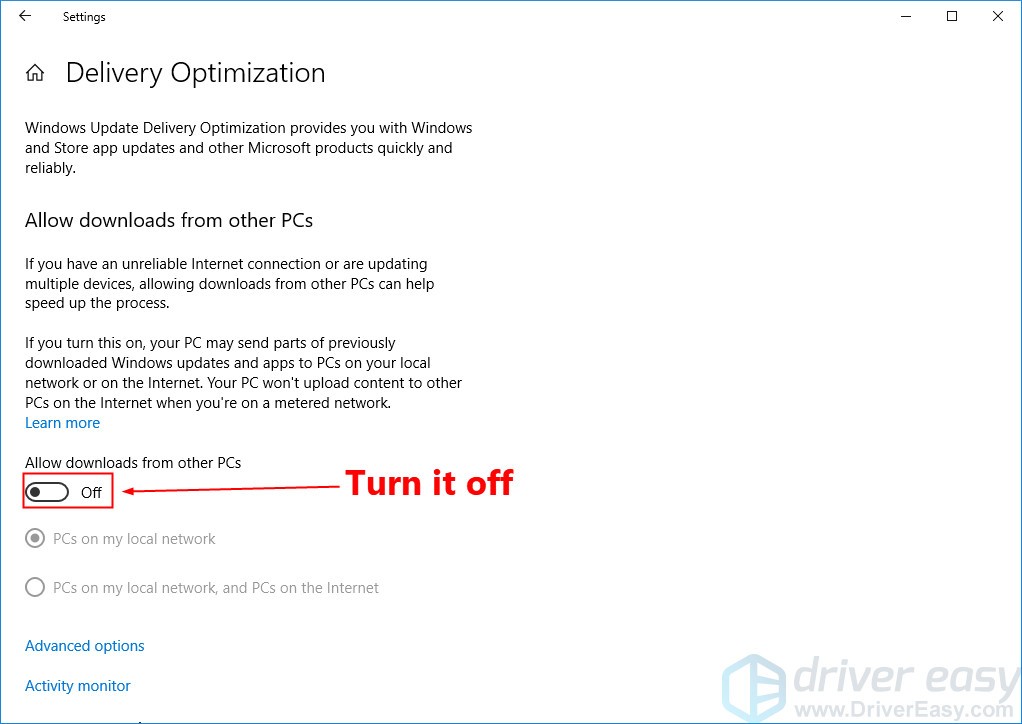
4) Turn off the toggle under Allow downloads from other PCs. You’ll be prompted for permission. Click Yes to turn this feature off.
See if the issue persists after you turn off this feature. If this issue remains, try disabling Windows Notification.
Fix 6: Modify Windows notification settings
Some Windows 10 users reported that Windows notification settings may casue the high CPU usage issue. Many of them fixed this issue by modifying Windows notification settings. You can also this this fix a try! Here is how to do it:
1) On your keyboard, press the Windows logo key and I at the same time to open Windows Settings. Then click System.
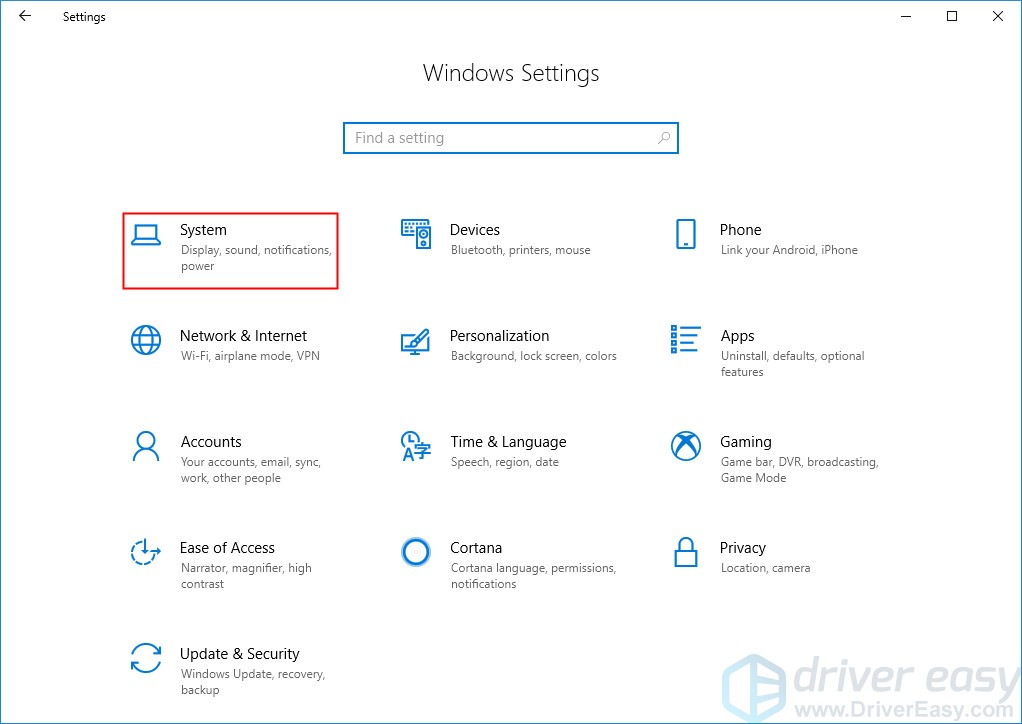
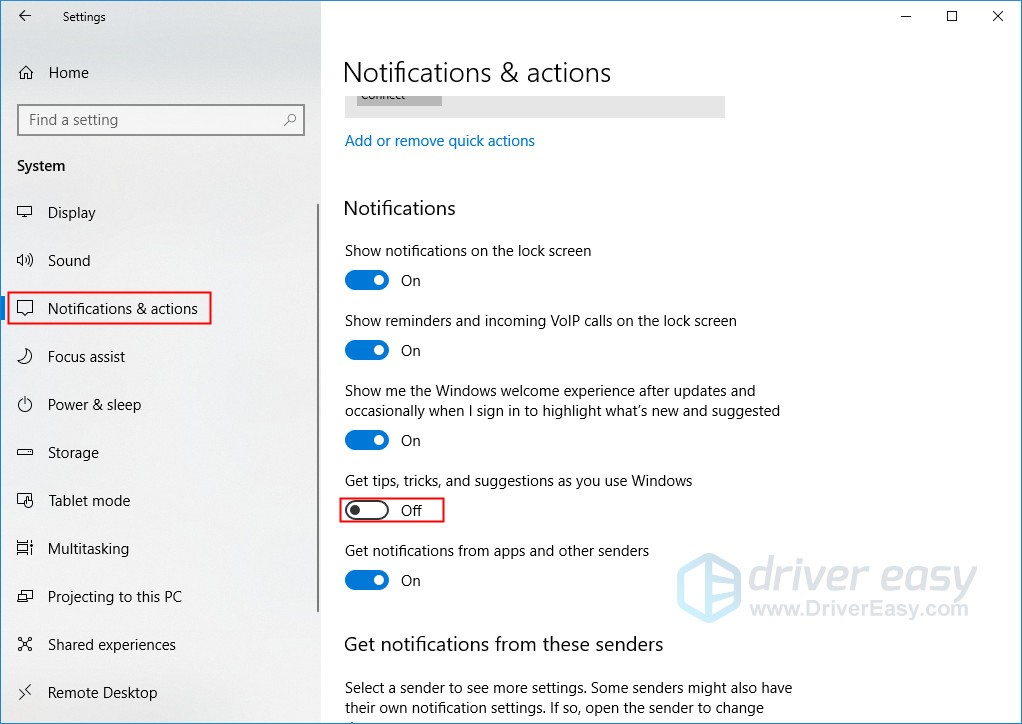
2) Select Notifications & actions on the left side of the pane. Then scroll down a little bit on the right side pane to turn off the feature Get tips, tricks, and suggestions as you use Windows.
See if the CPU 100% usage issue reappears after you turn off Windows Notification. If not, you’ve resolved this issue!
Hopefully one of the fixes above can help you resolve this issue. Please leave your comment below if you have any questions.
Источник