Clone Drone in the Danger Zone — 100% Achievement Guide
Have you gotten used to that crisp 100% completion, only to get it ripped away with the introduction of ‘content’ and ‘improvements’? Well, fear no longer as those days will soon be long behind you. With this handy guide you will be able to regain your status of gamer chad once more.
Complete Achievement Guide
The 12 Solo Challenges
Let’s be real, you already have these and they’re fairly easy to get. Before advancing on to the other achievements, go and beat these to get the basic skills you will need to survive longer than titanium. The best teacher here is experience and you’ll just have to git gud. Now go, off with you.
The 9 Co-op Challenges
Now while these 9 are not are difficult as the story, a few will likely trip you up here and there. You will need to survive for 35 rounds (most of the time) eventually battling the Insanium robots. How difficult this is will depend on how may people you have helping you out, and while it is not incredibly hard to do these with two people, having a group of 4 will speed things along. My only tip for you is.
Team revives are useful.
Story Insanity Completion
Story Insanity 1
- Beat Chapter 1 on Insane Difficulty!
Strap yourself in boys and girls because things are about to get disproportionately harder. There is no single way to beat this, (or any of the five chapters for that matter), so your best shot is to see what works for you.
And use these tips or whatever you know, it’s your life I’m not your mum like idc man.
- Learn how to cut through armoured enemies in one sword swing. You will either need to cut the robots right down the middle or in the gap between the upper and lower body. Your going to be fighting a lot of armoured robots so this will significantly speed up your progress of you can do it consistently.
- I recommend buying a bow, arrow deflect 1, then clones, clones and more clones. The bow will allow you to kill raptors safely and the arrow deflect will let you. deflect arrows. The best thing you can do after getting these two is just try to outlive the 10 rounds.
Now with those whole two handy tips do you feel ready to conquer the arena? Well you shouldn’t. I could tell you a thousand things to do in the thousand different situations you will be presented with during the story but then I realised you weren’t 2 and can figure this stuff you yourself. Seriously, just jump in and play.
Story insanity 2
- Beat Chapter 2 on Insane Difficulty!
Pretty much the same as Chapter 1 except for one thing. The Hammer! Those who use this as their weapon of choice finally get their time to shine. The same advice from chapter one stays relevant. A bow for raptors and arrow deflect. Or if you’re feeling particularly nimble maybe you could do it with just clones and your trusty hammer.
Story Insanity 3
- Beat Chapter 3 on Insane Difficulty!
This is another easy one. You have plenty of checkpoints and a lot of upgrade to start with. Unless you want to use the bow for the whole mission, I don’t recommend it. The AI is incompetent with it and will get more done with a sword or hammer. Once again, not too hard. You should be able to get through on your first attempt.
Story Insanity 4
- Beat Chapter 4 on Insane Difficulty!
For this you will have to become good with a spear. This is a tough one and you’l just have to buckle down and grind it out. Good luck.
Milestone Achievements
- Kill 500 enemies with a Bow!
I am on Fire!
- Kill 300 enemies with Flame Breath!
Hammer Master
- Kill 500 enemies with a Hammer!
Spear Master
- Kill 500 enemies with a Spear!
Sword Master
- Kill 500 enemies with a Sword!
Jetpack Master
- Kill 300 enemies while jetpacking!
Kick Master
- Kill 200 enemies by kicking them!
There is no trick to beating these, they simply are earned from playing the game. I recommend completing these last however as it will minimise the grinding you will have to do.
- Beat a level without killing anyone!
This is an easy one. All you have to do is kill all enemies with environmental hazards.
The easiest place to do this is the first level of the (singleplayer) kick only challenge, where you can lure the enemy into the central spikes.
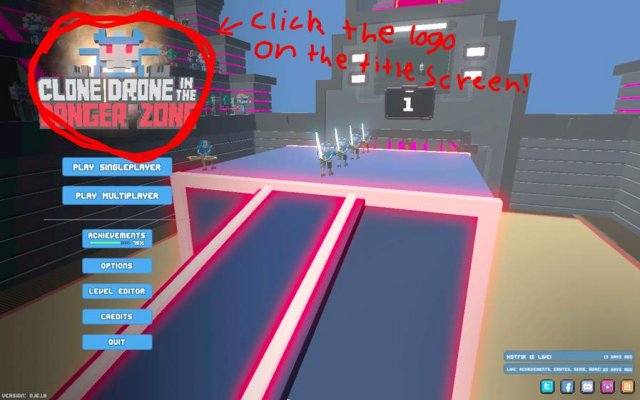
- Click the logo on the title screen!
You have to Click the logo on the title screen! I know, tricky. I’ve enclosed a handy diagram to help you out.
Let’s try another human!
- Die on level 1 of Endless Mode.
Open up endless mode and die to the first enemy.
- Rescue the War Cubes!
To complete this one, you will have to find an easter egg. The 7th level of Chapter 2 of the story is where you will have to reach first. Once beating this level instead of using the jump pad to get to the elevator, head sideways to the right, towards the pink. Go inside the little chamber to uncover the achievement.
If you’re still having trouble check out this video (12:35).
This is not co-op!
- Kick a clone towards the Elevator.
For this achievement you will need to have unlocked kick and have at least on clone. Once you have both of these, in the upgrade room, go over to where your clone stands and kick it towards the elevator until the achievement unlocks.
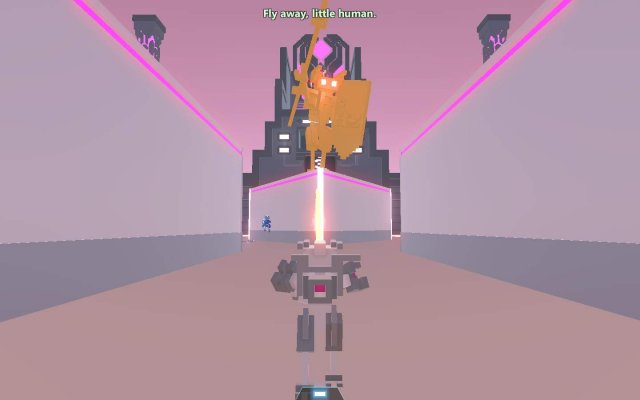
- Jump into the Emperor’s forcefield!
For this you will have to find a way to get high enough to reach the Emperor, (the big red guy on the throne). The only thing worth noting it that this cannot be obtained in co-op.
A few levels to look out for are these:
- Get 3 Team Revives in a public co-op game!
You will need to be playing co-op to achieve this, and have a minimum of 6 points. The team life upgrade costs 2 points per life, and you will need all 3. These are only counted for you, so don’t worry about having to race your teammates to them.
- Get every upgrade in the upgrade tree!
Okay, now things are getting difficult. To get every single upgrade, you will need 41 points. Insanium starts at level 33 so you will need to become fairly proficient to reach this mark. Unfortunately, this is just a guide telling you that you need to git gud, not how. You’re on your own for this one
Hello fellow human!
- Exchange Hellos with a human.
You’ll need to be in a multiplayer/co-op match for this one. Simply use the hello emote (press default key left alt), while your enemy/friend is using the same emote in your direction. It’s alot easier than I’m making it sound. Just both use the hello emote at each other.
I think it’s dead now
- Hit garbage on the ground repeatedly!
Self explanatory. After killing an enemy, continue hitting it where it lays dead on the ground.
How do you like it?
- Kick a kick bot to death!
The quickest way to achieve this is to do the kick only challenge. You will have to face kick bots and there will always be an environmental hazard to use.
The garbage is mine!
- Kill all the garbage bots.
After completing a level, you will have to kill the little green cube robots that come to collect the garbage. They’re fast and hard to melee so be quick!
- Melee an enemy while high above the ground!
Melee refers to the sword, hammer or spear. You will either need to hit an enemy while on a jump-pad or jumping of something. You should get this by chance while just playing.
There can be only one!
- Kill your clone.
Another self explanatory one. Just go over to where your clone is standing in the upgrade room and make sure it knows it’s place. Trash.
Fire on my mind
- Mind transfer into a Flame raptor!
Raptors can be found in Chapter 4 of the story or randomly in a Mind-Transfer challenge. All you have to do is get killed by the raptor.
- Kill 3 enemies with one attack!
This is easiest completed with a hammer. Just line 3 weak enemies up and get swinging.
They don’t call it Sanium
- Reach Insanium in Endless Mode!
That’s 33 levels. 33 levels of pain. 33 levels of suffering. But I believe in you, so go out there and prove to Doborog that you’re not just some talentless hack. Go show the arena what you’re made of. Get mad! I don’t want your damn emotes, what the hell am I supposed to do with these? Demand to see Doborog’s manager! Make them rue the day they thought they could give you a challenge! Do you know who I am? I’m the man who’s gonna burn your house down! With the emotes! I’m gonna get my engineers to invent a combustible emote that burns your house down!
- Reach Titanium in Endless Mode!
See above (15 levels for titanium).
Meet people, go insane!
- Reach Insanium in a public co-op match!
This one’s a little easier than doing it solo, because co-op is just easier in general. You shouldn’t have too much trouble with this one.
- Say Hello to Doborog!
This is a bit of an odd one. What you’re going to have to do is wait for the official Doborog channel to be streaming on Twitch. When this happens boot up the game and there will be a link to watch the stream from the main menu. Click it and get this achievement.
- Be the second to Last Bot Standing.
This is easier done when there are less player in a game, so try and hop in off peak if you can. If you are able to win, you will be able to lose. Dominate your enemies first and then kill yourself. How do you dominate them you ask? Well-
- Win a game of Last Bot Standing!
To win a gam of Last Bot Standing you will either need to be pretty good, or just get lucky. From my experience, the laser is really good. You can kill enemies from across the map before they even realise they’re in danger. The initial upgrades will matter less as the game goes on, as you pick up upgrades from the map, so just pick whatever you’re best with.
Tis but a scratch!
- Win 3 levels in a row with only one leg!
This is easiest done at the beginning of endless mode. The hard bit will be getting in a position where you only have one leg, and are still in control of the situation. Getting an archer to shoot it off by jumping at the right time, or jumping into a sawblade are my two recommendations. There’s a bit of luck required for this achievement however, so stay persistent.
Источник
Clone drone in the danger zone эмоции


Clone Drone in the Danger Zone


| 1,080 | уникальных посетителей |
| 39 | добавили в избранное |

Давайте сначала посмотрим на управление и на все начальные фитчи:
A
Здесь вы найдете все сделанные вами уровни:
1 Создать новый уровень
2 Создать новую папку
3 Сохранить текущий уровень (не забудьте делать это время от времени)
4 Папки могут помогать для создания челленджей, чтобы все уровни, входившие в этот челлендж, были в созданной вами папке (вроде так переводится)
5 Новые уровни будут создаваться с именем My new fun level, чтобы изменить название нажмите по нему двойным щелчком
6 Открытый вами уровень будет гореть зеленым цветом
Если вы хотите удалить ваш уровень или папку нажмите [Delete] кнопку на вашей клавитатуре.
Также вы можете делать копии ваших предыдущих уровней, нажав сочетание клавиш: [Ctrl] + [D].
B
Библиотека со всеми объектами, которые вы можете использовать для создания ваших уровней.
C
Символы для размещения и изменения ваших объектов.
1 Перетаскивать объект мышью
2 Перетаскивать объект по осям x y z
3 Поворачивать объект по осям x y z
4 Масштабировать объект (увеличить или уменьшить)
D
Здесь вы можите выбрать, что будут говорить робо-комментаторы на ваш уровень.
Изображения кубика (такой белый квадратик с тремя черными точками) выбирает рандомный коммент.
E
Протестируйте уровень, если теперь он играбельный, когда он готов загрузите его в Steam Workshop или создайте целый челлендж (будет объеснено позже в этом гайде).
Знак вопрос отправит вас на страницу с редактором уровней (на тот оригинал с которого я перевожу)
F
Измените свой угол обзора как слева, справа, сверху, спереди и сзади
G
Показывает в какой тир уровня сложности попадет ваш уровень (Покажут ваш уровень в зависимости от количества и вида противников)
Вы хотите разместить объект сейчас, не так ли?
Давайте посмотримм на эти картинки.
1 Выберите объект из списка объектов нажмите и перетащите его, также с помощью первом опции вы можете спокойно перетаскивать объект во все стороны (несможите только вверх и вниз)
2 Выбирая вторую опцию вам покажутся разноцветные стрелки. Они помогут вам перетаскивать объект по осям: x — красная, y — зеленая, z — синия.
3 Третья опция поможет вам вращать объект. Оси и их цвета все те же: x — красная, y — зеленая, z — синия.
4 Последняя опция наиболие сложная (не знаю почему автор сказал так). Вы можите использовать масшатирование к разным сторонам объекта (again along the x y z axes) Или просто увеличивать или умеьшать с помощью фиолетового квадратика объект полностью.
Также есть кнопки быстрого перехода к каждой опции:
[1] — Свободное перетаскивание с помощью мыши, перетаскивание объектов из листа объектов
[2] — Перемещение с помощью осей
[3] — Вращение
[4] — Масштабирование
Также есть специальные объекты, типо специальные платформы для прыжков и пилы, где вы сможите изменить больше чем просто положение в пространстве. Посмотрите в окно в верхнем правом углу после того как выбирете объект.
Я думаю вы не хотите пропустить команды для создание каких либо специальных объектов (Фигур, строений и т.д.):
[Ctrl] + [C] — Копировать выбранный объект
[Ctrl] + [V] — Вставить выбранный объект (причем он будет появляться рядом с копируемым объектом)
[Del] — удалить выбранный объект
Размещение будут увеличивать таблицу сложности, которая будет показывать в какой тир сложности входит ваш уровень.
Нажатие листа с плюсом (В таблице сложности естественно), добавит вам новый шаблон где вы сможите размещать разных противников. Мусорный ящик удалит выбранный шаблон.
Первая таблица поможет вам узнать сколько очков сложности дает каждый противник и вторая таблица поможет вам уузнать сколько очков сложности можно потратить для каждого тира
Bow1 100
Bow2 300
Bow3 500
Bow4 700
Hammer1 200
Hammer2 400
Hammer3 800
Jetpack1 500
Jetpack2 800
Jetpack Archer 700
Jetpack Hammer 600
Kickbot 400
Spidertron5000 500
Spidertron600 1000
Sword1 100
Sword2 200
Sword3 500
Sword4 700
Bronze 0-600
Silver 700-1500
Gold 1600-2800
Diamond 2900-4000
Titanium 4100+
Хотите сделать так чтобы ваш бот был послушным парнем, и ждал пока вы не дойдете до определенного момента?
Тригерзоны вам в этом помогут!
Как обычно возьмите и перетащите объект из листа объектов. После того как вы разместили и изменили его как вам надо, выберите противника (нажав по нему ЛКМ), вы должны будите выбрав к какой зоне он будет привязан чтобы атаковать.
Суть заключается в том, что если стрела пролетит через эту зону, или вы войдете в нее, то она активируется, и противники привязанные к этой зоне начнут атаковать вас.
Например если игрок войдет в зону B, то проивник bow1 начнет атаковать игрока.
Ваш уровень выглядит неподвижным, и вы хотите добавить что-то, что движется?
Движущиеся платформы вам в этом помогут.
Они имеют уйму опций и конфигураций. Зеленая прозрачная копия платформы показывает, где она будет иметь конечное положение. Прежде всего установите конечную позицию, введя координаты перемещения. Если менять число только в «Travel X», то платформа будет скользить вверх и вниз. Большинство опций объясняются сами собой, но все же сложны.
Если, например, вы хотите, чтобы плаформа появлялась только тогда, когда игрок победит последнего врага, вам нужно выбрать «Start Inactive» and «Go To End On Level Over» (как показано на скриншоте).
Другой пример: вы хотите, чтобы какой-нибудь гигант появился, когда вы попадете в зону (понадобится тригер зона в начале). Поставьте галочку на «Stop At End» и на той зоне которую вы поставили.
Это лишь два варианта использования движущейся платформы. Если вы немного поэкспериментируете, вы наверняка сможете создать с ними еще что-то более потрясающее
После того, как вы создали уровень, вам наверняка захочется поделиться своим творение со Steam community. Для этого вам придется всего лишь нажать «Upload Level» написать название и описание уровня и нажать «upload to workshop». Так же вам придется выбрать, как будут описывать боты-комментаторы ваш уровень.
Но вам придется сначала пройти свой уровень прежде чем загрузить.
Теперь ваш уровень проходим, и он добавлен в Endless mode.
Но что может противопоставить всего лишь один уровень целому челленджу, так?
Чтобы создать челлендж нажмите «make challenge», и вам покажут это окно:
Нажмите «Add Level», и он покажет вам все ваши уровни, чтобы выбрать один из них, также вы можете добавлять один и тот же уровень с разными шаблонами врагов.
«Configure Upgrades» дадут вам выбор, какие апгрейды будут даны игроку сразу, а какие и во все невозможны для изучения. Для запрета нажмите по апргейду правой кнопкой мыши, а для того, чтобы дать апгрейд игроку в самом начале, нажмие по нему ЛКМ.
И опять же, для того, чтобы загрузить его вам придется его пройти.
Если вы прошли и сделали на уровнях все что хотите, нажмите «Publish to Workshop».
(Это я тоже переводил)
Теперь вы готовы для создания классных уровней.
Создайте уровень с 1000 бойцов.
Создайте паркур.
Попробуйте убить игрока с помощью различных ловушек (шипов, пил).
Дайте игроку искупаться в лаве.
Вы можите не читать это, ведь речь тут пойдет не об уровнях, а чисто мои слова.
Я хочу сказать что мне всего лишь 13 (но скоро уже 14), и я прошу прощения если здесь будет много ошибок. Я решил помочь нашему комьюнити в создании уровней, если кто-то с чем-то не разобрался.
Я буду рад, если вы напишите мне мои ошибки, которые я допустил в этом руководстве.
Источник